125 to 225 gal upgrade
- Thread starter m2140
- Start date


The craftsmen shift looks great but in my honest opinion I don't thing the side supports are strong enough. Maybe I'm wrong but it looks like all u have is two 2"X6" on each corner. If so there is no where enough support. Thing about, only if the tank was filled with water, just in water weight u have a little over 2000lbs. Not including the tank. Then add in the rock and sand. Try a few tests. Before u even thinking about setting the tank on it. Get on one side a try to tip it over. If u get any play at all it's not strong enough.
I'm upgrading to a 300 peninsula as well and also building my own stand. This is just the frame for the stand still need to skin it.


There's 39 2X4s in this beast. But I know it's strong. I stood it on end and knocked it over and nothing bugded.
I'm upgrading to a 300 peninsula as well and also building my own stand. This is just the frame for the stand still need to skin it.
There's 39 2X4s in this beast. But I know it's strong. I stood it on end and knocked it over and nothing bugded.
Here is the completed stand without the skin. I'm using 2x6 for all the long 6 ft spans and for legs at all 4 corners. The rest is a ton of 2x4 to reinforce the supports including the legs. Each joint has a minimum of (4) 2 1/2 screws (2 on each side) to make every single joint stronger. 2x6 joints have 5 screws with 3 on the inside and 2 on the outside. The legs are a combination of 2x6 at the corners along with a 2x4 on each side corner to anchor and add additional support. The legs are tied to the main supports as well as to each other in the corners. This thing is solid and has no play at all. My kids and I all got on it and surfed it to try and get some movement and it stayed solid.


The craftsmen shift looks great but in my honest opinion I don't thing the side supports are strong enough. Maybe I'm wrong but it looks like all u have is two 2"X6" on each corner. If so there is no where enough support. Thing about, only if the tank was filled with water, just in water weight u have a little over 2000lbs. Not including the tank. Then add in the rock and sand. Try a few tests. Before u even thinking about setting the tank on it. Get on one side a try to tip it over. If u get any play at all it's not strong enough.
I'm upgrading to a 300 peninsula as well and also building my own stand. This is just the frame for the stand still need to skin it.
There's 39 2X4s in this beast. But I know it's strong. I stood it on end and knocked it over and nothing bugded.
I'm upgrading to a 300 peninsula as well and also building my own stand. This is just the frame for the stand still need to skin it.
There's 39 2X4s in this beast. But I know it's strong. I stood it on end and knocked it over and nothing bugded.
When I first started the design of the stand I was worried about the weight as well. I borrowed this design from tanks stands that are already up and supporting weight. There are many examples around the web. I also looked at stands made by advanced aqua tanks and you would be surprised how little support they have compared to my design or yours. Using 2x6 boards makes a huge difference in how much weight a single board can support. Not even two 2x4's put together are as strong as a single 2x6.
What kind of paint are you using on your stand? I was thinking about an outdoor solid stand and then water proof the wet areas around the sump. Rust oleum makes a really good product that let's the water just sheen off. I've also used silicone to seal all the seam and prevent water from getting between the joints under the sump and rot the stand.
Sent from my iPad using Tapatalk
So it's been a while since I updated the build because I had to get the area for the new tank ready. I convinced the wife to let me take out and redo a wall to make room for the new tank. So I spent the last couple week doing demo and construction. Here is a quick pic of the new location. After I get the tank up I plan on making some millwork to make the tank look built in.

I also got the stand done today. Got it all stained and water proofed. I used an outdoor stain that I had left over from another project.

Lastly the new sump came in today. It's a custom made sump that is 60 x 22 x 18 tall. Fits perfectly into the stand and it's about 103 gallons. I had it designed to use 4 small filter socks, enough space for a large skimmer, and a big refugium. I'll post more pics once I get it all setup and plumed this weekend.

Sent from my iPad using Tapatalk
I also got the stand done today. Got it all stained and water proofed. I used an outdoor stain that I had left over from another project.
Lastly the new sump came in today. It's a custom made sump that is 60 x 22 x 18 tall. Fits perfectly into the stand and it's about 103 gallons. I had it designed to use 4 small filter socks, enough space for a large skimmer, and a big refugium. I'll post more pics once I get it all setup and plumed this weekend.
Sent from my iPad using Tapatalk

 op2:
op2:Plumbing took for ever this weekend. I tried to plan it all out but once I got under there had to make some changes. I found these nice long 90 degree turn at Lowes. They should help the flow coming from the tank move better with less air getting trapped. I also was going to do only 45 degree fittings on the supply into the tank to reduce flow loss. But after planning it out I would need more than twice as many fittings reducing flow eve more.
Doing a leak test now.
Overall view from the front:

View from the back. The white pipes are supply from the pump. Black is drain. I'm going to power my media reactor from my main pump. Wish I could power my skimmer in the same way. I'm using a 1/2 t to supply the reactor and I have a ball ball to control the flow.

Here you see the drain from the left side. I'm using 2 valves for a reason. First there is a gate valve that allows me to fine tune the flow into the sump. Once I get it tuned I don't want to have to mess with it every time I need to do any form of maintenance. So I added a 2nd ball valve for quick shutoff. Can't shutoff a gate valve quickly.

View from the right side. Same as the left but here you can also see the path out from the pump into the tank. I'm using a check valve on each side of the tank. I could not get away with just one because I'm using my main pump to power media reactor and maybe an algae turf scrubber later down the road. You can't see it I the pic but above each check valve I have another ball valve. This way I can shutoff the water from my tank and clean the check valves regularly.

Here is the main output from the pump. In order to fit I had to use 2 45s to allow me to send the output to a tee with 2 unions on it. The 2 unions was important because it allows me to disconnect the pump with a union right at the pump. The unions above at the tee allow me to swing up the pipes for easier access and for maintenance.

Now for the overflows, this tank has 2 overflows one on each side. Each overflow has a durso pipe & a SCWD splitting the output into 2 vortek flow accelerators.

Pic of the SCWD's. Lots of unions because these guys require regular cleaning in order to work. My kids say they look like T100 Terminators. Found them on each side waiting to play rock and sock me robots.


Let me know what you guys think.
Sent from my iPad using Tapatalk
Doing a leak test now.
Overall view from the front:
View from the back. The white pipes are supply from the pump. Black is drain. I'm going to power my media reactor from my main pump. Wish I could power my skimmer in the same way. I'm using a 1/2 t to supply the reactor and I have a ball ball to control the flow.
Here you see the drain from the left side. I'm using 2 valves for a reason. First there is a gate valve that allows me to fine tune the flow into the sump. Once I get it tuned I don't want to have to mess with it every time I need to do any form of maintenance. So I added a 2nd ball valve for quick shutoff. Can't shutoff a gate valve quickly.
View from the right side. Same as the left but here you can also see the path out from the pump into the tank. I'm using a check valve on each side of the tank. I could not get away with just one because I'm using my main pump to power media reactor and maybe an algae turf scrubber later down the road. You can't see it I the pic but above each check valve I have another ball valve. This way I can shutoff the water from my tank and clean the check valves regularly.
Here is the main output from the pump. In order to fit I had to use 2 45s to allow me to send the output to a tee with 2 unions on it. The 2 unions was important because it allows me to disconnect the pump with a union right at the pump. The unions above at the tee allow me to swing up the pipes for easier access and for maintenance.
Now for the overflows, this tank has 2 overflows one on each side. Each overflow has a durso pipe & a SCWD splitting the output into 2 vortek flow accelerators.
Pic of the SCWD's. Lots of unions because these guys require regular cleaning in order to work. My kids say they look like T100 Terminators. Found them on each side waiting to play rock and sock me robots.
Let me know what you guys think.
Sent from my iPad using Tapatalk
Plumbing took for ever this weekend. I tried to plan it all out but once I got under there had to make some changes. I found these nice long 90 degree turn at Lowes. They should help the flow coming from the tank move better with less air getting trapped. I also was going to do only 45 degree fittings on the supply into the tank to reduce flow loss. But after planning it out I would need more than twice as many fittings reducing flow eve more.
Doing a leak test now.
Overall view from the front:
View from the back. The white pipes are supply from the pump. Black is drain. I'm going to power my media reactor from my main pump. Wish I could power my skimmer in the same way. I'm using a 1/2 t to supply the reactor and I have a ball ball to control the flow.
Here you see the drain from the left side. I'm using 2 valves for a reason. First there is a gate valve that allows me to fine tune the flow into the sump. Once I get it tuned I don't want to have to mess with it every time I need to do any form of maintenance. So I added a 2nd ball valve for quick shutoff. Can't shutoff a gate valve quickly.
View from the right side. Same as the left but here you can also see the path out from the pump into the tank. I'm using a check valve on each side of the tank. I could not get away with just one because I'm using my main pump to power media reactor and maybe an algae turf scrubber later down the road. You can't see it I the pic but above each check valve I have another ball valve. This way I can shutoff the water from my tank and clean the check valves regularly.
Here is the main output from the pump. In order to fit I had to use 2 45s to allow me to send the output to a tee with 2 unions on it. The 2 unions was important because it allows me to disconnect the pump with a union right at the pump. The unions above at the tee allow me to swing up the pipes for easier access and for maintenance.
Now for the overflows, this tank has 2 overflows one on each side. Each overflow has a durso pipe & a SCWD splitting the output into 2 vortek flow accelerators.
Pic of the SCWD's. Lots of unions because these guys require regular cleaning in order to work. My kids say they look like T100 Terminators. Found them on each side waiting to play rock and sock me robots.
Let me know what you guys think.
Sent from my iPad using Tapatalk
I like it. How often do you have to clean the SCWD? Are you going to paint the return pipe black or leave them white?
For the pipes I don't plan on painting. I don't mind the colors so I think I'm going to leave it as it. I did get tempted by the new BRS colored pipes but not enough too spend the extra money.
Sent from my iPad using Tapatalk

I made some more progress on the tank setup. I'm not as far as I wanted to be but I got a lot done this weekend.
Here is a pic of the canopy frame structure. I made the back open with no support on top so that I can get in better during maintenance. This tank is deep and I'm short so I need a little extra space.

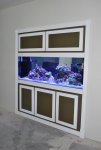
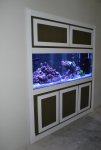
With the canopy structure in, I put on the trim around the tank. I still need to make the doors but that is for next week. I want to get fish and coral in this next week.

Here is the completed canopy cover from the back. The whole back of the canopy is one large panel door.


I'm real proud of the design on how the canopy opens. I did a double hinge setup using 4 stainless steel piano hinges. The whole panel folds out of the way on top of the canopy.


I'm working on getting the lights in and the doors made by next week. Let me know what you guys think about the design and color pallet.
Sent from my iPad using Tapatalk
Here is a pic of the canopy frame structure. I made the back open with no support on top so that I can get in better during maintenance. This tank is deep and I'm short so I need a little extra space.
With the canopy structure in, I put on the trim around the tank. I still need to make the doors but that is for next week. I want to get fish and coral in this next week.
Here is the completed canopy cover from the back. The whole back of the canopy is one large panel door.
I'm real proud of the design on how the canopy opens. I did a double hinge setup using 4 stainless steel piano hinges. The whole panel folds out of the way on top of the canopy.
I'm working on getting the lights in and the doors made by next week. Let me know what you guys think about the design and color pallet.
Sent from my iPad using Tapatalk


Here is how I did my wire management for the Hydra power supplies. I used a spare diffuser I had left over from my old frag tank.

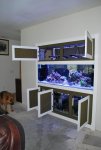
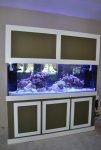
I also got the fish and all the coral in today after a large water change with water from my old tank.
View from the front

View from the back

Sent from my iPad using Tapatalk
I also got the fish and all the coral in today after a large water change with water from my old tank.
View from the front
View from the back
Sent from my iPad using Tapatalk