1st build, our 70 gal rimless

Avstepper

New member
Joined
Sep 14, 2014
Messages
122
Likes
0
Points
0
Location
crestline, california
#1
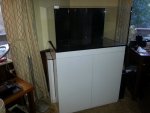
Ok here is our 1st reef tank build. we are going to do 3 builds and this is the 1st.
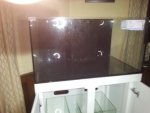
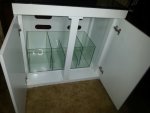
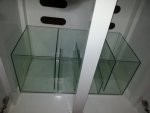
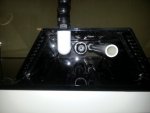
its a 70 gal cad lite rimless tank, it came with sump, stand, return pump and plumbing.
We picked this up at the RAP show, when we got it home noticed it had metric pipe and fittings
for the plumbing, after reading some threads here, that some where have probs with
the plumbing I took the tank to cad lites and had them redrill the tank for s.a.e. fittings.
I will be putting up photos as we go, so enjoy and please tell us what you think and any help would be great.


70_cad_lite.jpg
 

Tangwich

2
2020 Philanthropist
Joined
May 20, 2009
Messages
11,967
Likes
1,099
Points
63
Location
Pasadena
#4
sounds like some good builds to come. pics and post...pics and post and repeat : )
 
Joined
Dec 1, 2011
Messages
3,608
Likes
35
Points
48
Location
92804
#5
Nice setup, and very smart of you to have cadlight redrill the holes to standard. I have the same setup, but have since upgraded most of the equipment since.
 

Avstepper

New member
Joined
Sep 14, 2014
Messages
122
Likes
0
Points
0
Location
crestline, california
#6
Nice setup, and very smart of you to have cadlight redrill the holes to standard. I have the same setup, but have since upgraded most of the equipment since.
thanks, I had them redrill it after I seen on here that people where have problems, because of where they had drilled it org., they could only drill for a 1" drain, a 3/4" emerg, and a 1/2" return
so the bulkheads would fit, but that should be good enuff. so anything else I should watch for or do to this tank that you have found,? what upgrades have you done?
 
Joined
Dec 1, 2011
Messages
3,608
Likes
35
Points
48
Location
92804
#7
[MENTION=9016]Avstepper[/MENTION], I upgraded the lights to ati, sump to a AA 32x20x15, skimmer to a vertex150, fuge light to a par38 57k, made my own cover with clips, drilled 2 holes for fan linked to my RKL to control humidity on the stand. Since my tank was built prior to their herbie hybrid redesign. I hard plumbed both predrilled as my main and emergency then went up and over for my return....so far I love this tank and have taken me too many peaceful thoughts at time of dispar....
 

Avstepper

New member
Joined
Sep 14, 2014
Messages
122
Likes
0
Points
0
Location
crestline, california
#8
ok here what got done today, tanks in place and leveled, and here is a couple of pixs of the sump in place, also got the inside plumbing done.
going with a herbie style drain in 1", then a emerg. drain in 3/4 " and a return in 1/2, I will be doing the sump plumbing moch up tonight
and I will post pixs so you all can see and give me any ideas or changes I should make before final plumb.

tank2.jpg sump1.jpg sump2.jpg plumb1.jpg

:popcorn:
 
Joined
Dec 1, 2011
Messages
3,608
Likes
35
Points
48
Location
92804
#10
Also you should try out the main drain without the stand pipe, you'll definitely thank me after 6month..if not then keep the stand pipe but for sure remove the strainer, it'll be a PITA to keep clear and clean..
 
Joined
Dec 1, 2011
Messages
3,608
Likes
35
Points
48
Location
92804
#12
[MENTION=9016]Avstepper[/MENTION] main drain is not going to clog. If it does just make sure to put a union on the drains for easy disconnect. As for the return, you want the 3/4 piping...
 

Avstepper

New member
Joined
Sep 14, 2014
Messages
122
Likes
0
Points
0
Location
crestline, california
#13
ok I decided I want to keep the 3/4 for the emerg drain with using the 1' for the main, I going to start with using the 1/2 for the return for now, I know I am going to up grade the return pump and at that time I will go up and over with a 3/4 return at that time , like [MENTION=5085]newtothis[/MENTION] has done. I did pick up a new gyre pump for the inside also.
 

Avstepper

New member
Joined
Sep 14, 2014
Messages
122
Likes
0
Points
0
Location
crestline, california
#14
ok here is the lower plumbing, its temp not glued. as I has mentioned above I will be upgrading the return plump down the road and at that time
I will go with a 3/4 return line and go up and over the back rim. also sorry about the crappy photos taken with my phone.
Let me know what you think before I finalize this.


[ATTACH=CONFIG]39243.vB[/ATTACH] [ATTACH=CONFIG]39244.vB[/ATTACH] plumb3.jpg
 

pgr11

Member
Supporter
Joined
Jul 26, 2011
Messages
11,011
Likes
92
Points
48
Location
Hesperia
#15
If I were you I'd put a ball valve just above the check valve. That way when you need to service the flapper you can simply isolate it from the rest of the tank. If you don't you'll drain all the water out of the overflow and all over the place.
 
Joined
Jul 23, 2007
Messages
1,798
Likes
10
Points
38
#16
nice tank. I just got the same setup as your and James, but the overflow only have 2 holes in it. It doesn't come with plumbing so it is worry me about metric pipe size.

Dave what kind of light you plan to keep on this tank?
 

Avstepper

New member
Joined
Sep 14, 2014
Messages
122
Likes
0
Points
0
Location
crestline, california
#17
nice tank. I just got the same setup as your and James, but the overflow only have 2 holes in it. It doesn't come with plumbing so it is worry me about metric pipe size.

Dave what kind of light you plan to keep on this tank?

I got a maxspect razor the 27" 16000 that I am going to hang above it.

If I were you I'd put a ball valve just above the check valve. That way when you need to service the flapper you can simply isolate it from the rest of the tank. If you don't you'll drain all the water out of the overflow and all over the place.
I thought about that but I went this way because the check valve has a union built in and its the return line so the only water will be just the little that's in the hose,
and I figure that wont be much at all. the line just runs up thru the overflow. so It wont drain the overflow when I disconnect the check valve.
 
Joined
Dec 1, 2011
Messages
3,608
Likes
35
Points
48
Location
92804
#18
nice tank. I just got the same setup as your and James, but the overflow only have 2 holes in it. It doesn't come with plumbing so it is worry me about metric pipe size.

Dave what kind of light you plan to keep on this tank?
[MENTION=207]NVTE[/MENTION] lmk when your ready to setup and I'll help you with the plumbing...
 
Joined
Dec 1, 2011
Messages
3,608
Likes
35
Points
48
Location
92804
#20
hey james, [MENTION=5085]newtothis[/MENTION] how did you do your up and over return lines? did you just do them with PVC or?
Yeah hard plumbed everything up until it enters the tank I use locline with nozzle on both side of the over flow. Only reason I went this route bc I only have 2 predrilled hole which I end up using as my herbie drain. Your tank is a newer design so it has 3 predrill. I'm also assuming your overflow is bigger to accommodate which in turn your loosing more real estate.. It's still a nice tank regardless
 

Latest posts

Top