Here's how I bought it. 36x36x24


I had pictures but can't find it. I cut the original class overflow box out and had jaden over at ultimate acrylics make ma a new slimmer floating overflow.

Tank stand is real short. So I drilled hole in the flooring and ran the plumbing into my garage under the house. I also gave it a 2x4 lift.
I have a barracuda gold as return.


Houston, we have water

Initial aquascape

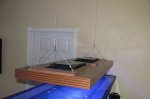
Building the hood


I originally planned for the tank to be on this left wall so I plumbed it there. I changed my mind so some plumbing is bove ground. So I built a protected area so no one steps on the pipes.
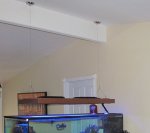
Triednmy best to blend it All together.


I had pictures but can't find it. I cut the original class overflow box out and had jaden over at ultimate acrylics make ma a new slimmer floating overflow.

Tank stand is real short. So I drilled hole in the flooring and ran the plumbing into my garage under the house. I also gave it a 2x4 lift.
I have a barracuda gold as return.


Houston, we have water

Initial aquascape

Building the hood


I originally planned for the tank to be on this left wall so I plumbed it there. I changed my mind so some plumbing is bove ground. So I built a protected area so no one steps on the pipes.
Triednmy best to blend it All together.