Jay's 150 Gallon Reef Build Journal

JJsBoas

New member
Joined
Mar 9, 2013
Messages
108
Likes
1
Points
0
Location
Azusa
#1
Hey SCR,

So after moving to a new house last summer and months and months of settling in (i.e., painting the interior myself, letting my wife buy new furniture, planning and installing some landscaping myself, and basically living by the mantra happy wife, happy life), I finally got the go ahead to start up a new reef tank. But this reef is something special for me because (1) its my birthday present to myself, and (2) its my first big reef build.

My last reef was a 40 breeder that was up less than a year. As luck would have it, the 40 breeder started looking good at about the month I had to break it down for the move. After moving to a bigger place and initially thinking I wanted to downgrade, I got my head straight and told myself, screw it, lets go big. :a21::a21::a21:Luckily I have a pretty significant birthday coming up, so it was difficult for my wife to say no to this birthday present.

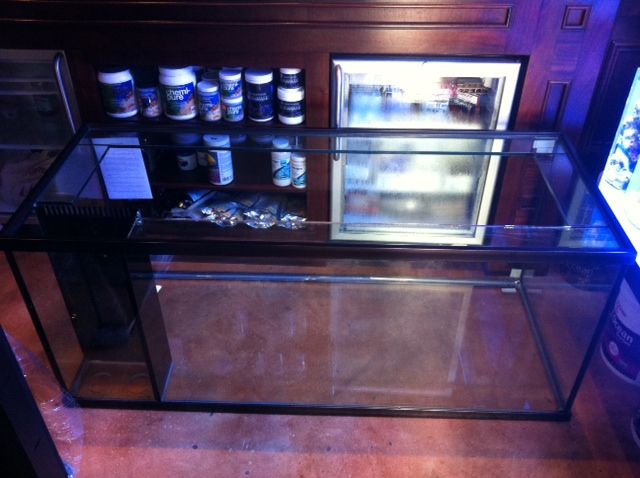
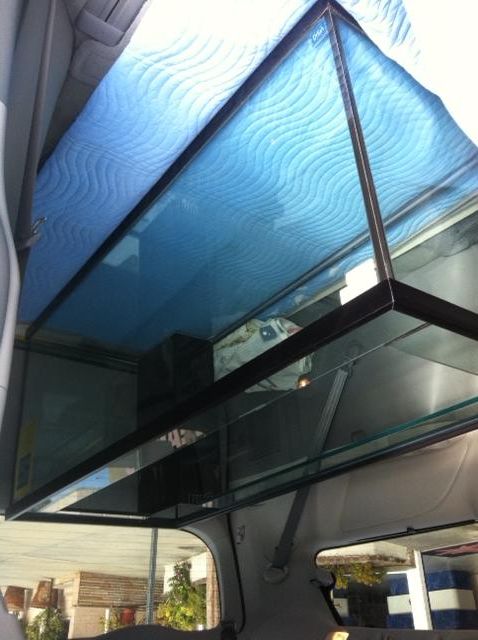
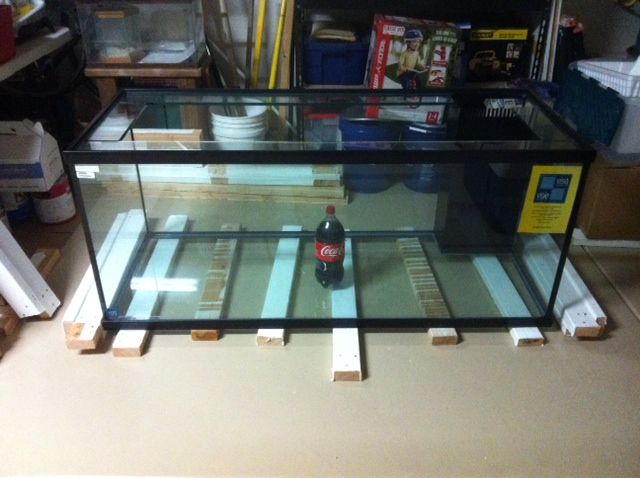
I just ordered the new tank last week from Aaron at SPS Coral Store. Its 150 gallons, 5x2x2!!! The tank itself is nothing fancy. I didnt opt for a rimless because I wanted a canopy on it to avoid/decrease the light spill into the room since the tank is going in the room where we spend most of our family time watching tv and hanging out.

Im going to use this thread as a journal for myself to keep track of this builds progress, as well as to ask questions and seek advice from you guys who have a lot more experience than I do with large reef builds.

Heres the drawings of the tank I got from Aaron:


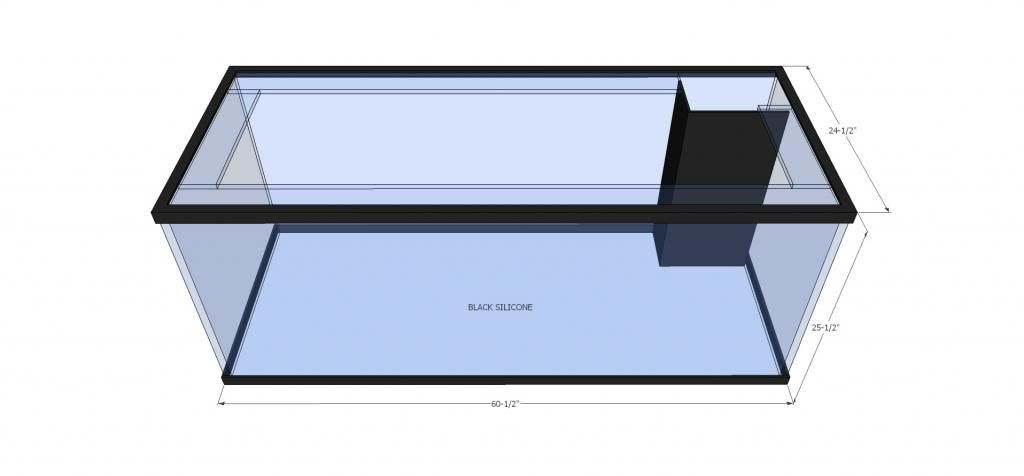
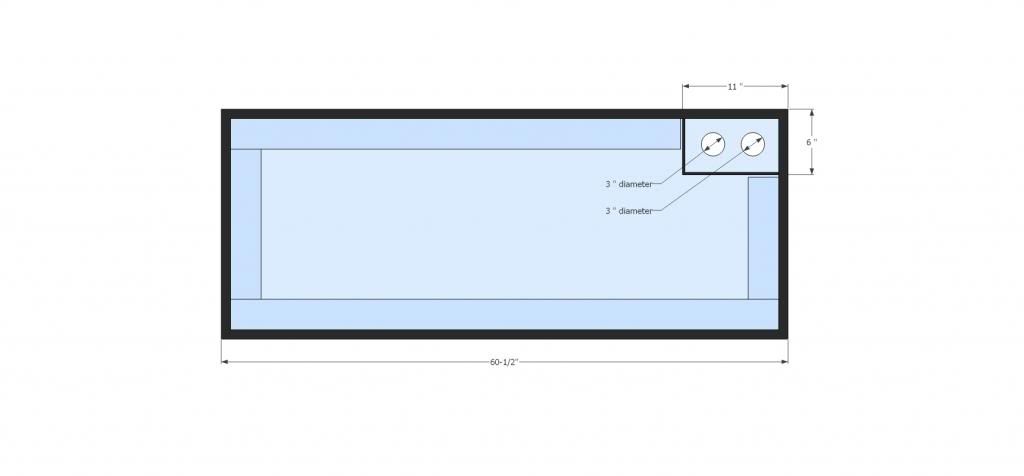
Tank specs: 150 gallon, Visio 5x2x2, with perimeter bracing, and corner overflow, drilled for 1 Sch 80 bulkheads.

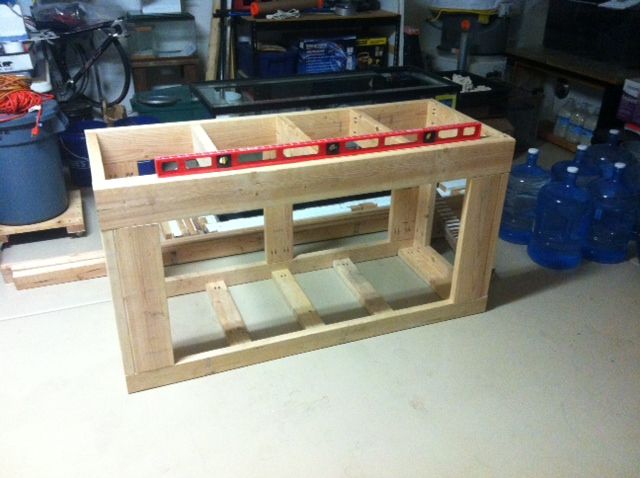
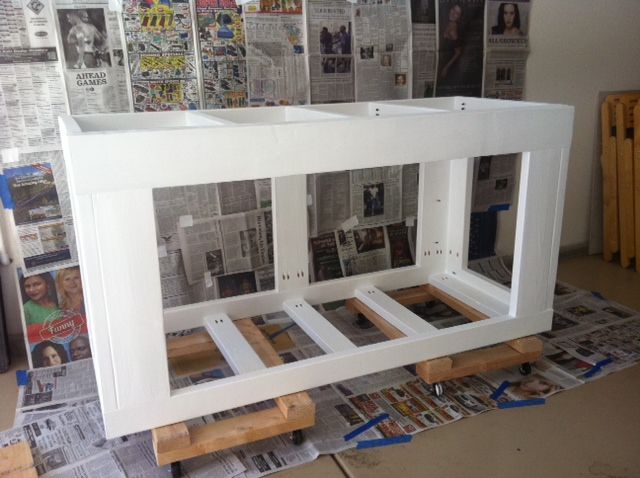
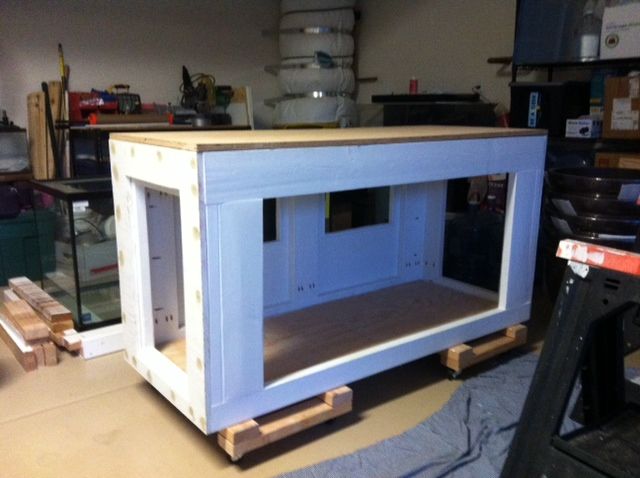
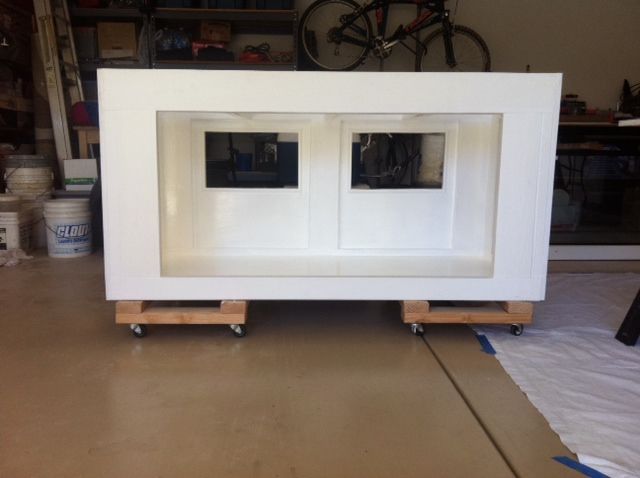
Though it may not seem like much to some of the large tanks I've seen here and on RC, it's a huge step for me. Before this, the biggest successful reef I had was a 60 gallon. For my 150, I opted for the perimeter bracing for ease of maintenance and lighting. Also, although the overflow will be plumbed with Spears sch 80 bulkheads, the drains and other plumbing will be sch 40. I wanted to minimize the risk of leaks through the bulkheads and so I decided on using these big sch 80 bulkheads Aaron showed me. Ill be running a Herbie overflow to try and keep things quiet.

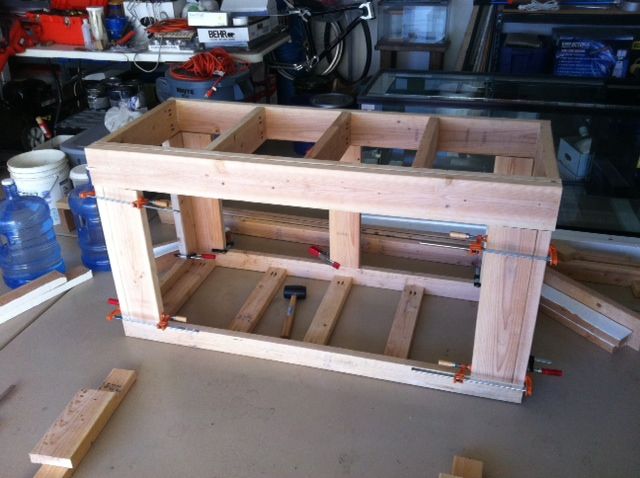
The tank is supposed to take 2-4 weeks to be built. I'm hoping to get it in the garage by the end of the month. In the meantime, I need to finalize the rest of the plans for the build. I'll be posting my plans for the build over the next few days. I'd appreciate any advice and opinions you guys can offer. I want to get this build right the first time around.

Although I'd love for this tank to be fully operational ASAP, I know this isn't going to happen. I have a budget keeping me in check as my wife and I are still getting used to life with a mortgage. Also, my soon-to-be 2 year daughter takes up most of my free time, which I'm definitely not complaining about (especially since her love for my other tank is part of the reason why I got the go ahead for this big bad boy:lol::lol::lol:).

That being said, this build is going to be slow (but hey, slow and steady wins the race in this hobby). All and all, I'm excited as hell about this build, but scared sh!tless at the same time since this is my first big build. Thanks for putting up with my rambling (again I'm excited). I'll do my best to keep the thread updated as things progress.

Do you guys and gals have any upfront advice you can offer before I get in too deep with the build? Is there anything you'd do different with your builds that I should consider with mine?

Thanks for any and all input,

Jay
 

JJsBoas

New member
Joined
Mar 9, 2013
Messages
108
Likes
1
Points
0
Location
Azusa
#2
BTW, I'm planning a mixed reef with a few nice zoa colonies and maybe some ricordeas, a couple nice mushroom leathers (I have a green and want to get a decent frag of a long polyp Sarcophyton leather), 1 or 2 branching hammer colonies, and a few other LPS. Most of the corals will be some easier to keep SPS, like birdsnest, pocillipora, monitpora (digis and some encrusting types), and some easier acros, such as green slimer.

Fish list is still up in the air. However, I definitely want a pair of captive bred clowns (not sure which species or type yet) and at least 2 tangs in this tank, possibly a yellow tang and a kole or tomini tang. I've also been thinking about trying to keep mostly captive bred fish in this tank, so a couple CB Banggai cardinals and a CB orchid dottyback are possibilities for the fish stock list. Any other captive bred suggestions that are easy to get at the LFS around here?
 
Joined
May 10, 2013
Messages
2,749
Likes
17
Points
0
Location
Sunland, Ca
#3
Plan out the sump carefully, keep in mind the skimmer you want and any reactors your gonna run, whether you want internal or external return pump, refugium etc. Ideally you want it all to fit in the stand. Unless you have a fish room and can plumb everything through the wall into the room.
Also consider running a manifold and a return pump with enough gph to run reactors and chiller as well as the returns.
The fewer pumps the better, imho

HTH sounds like its gonna be a nice build.
Ask Aaron questions, he will be more than happy to help you.
 

Six2seven

Premium Member
Supporter
Joined
Dec 27, 2011
Messages
8,473
Likes
24
Points
38
Location
San Pedro, CA
#4
Welcome jay! I love my 5x2x2, I felt and still feel that it is the perfect size. As mentioned, plan the sump carefully for what you might want down the line. It will save you money from upgrading later. Get the biggest sump you can.
 

JJsBoas

New member
Joined
Mar 9, 2013
Messages
108
Likes
1
Points
0
Location
Azusa
#5
Thanks for the input, Jim and Steve.

Here's what I have planned so far for the rest of the build:

Skimmer: I have a Reef Octopus NWB 150, with 6” body. I bought this for my old 40 breeder, and it was way too much skimmer for that tank. I’m well aware that this will be undersized for a 150 gallon, but I’m hoping to upgrade to an Aquamaxx Ecomaxx EM300 by the end of the year. I like the value of the Aquamaxx and I’ve read good reviews on its quietness and performance. In the meantime, I’m going to keep the bioload pretty low so I can use the Reef Octopus until the upgrade. I’m hoping the Reef Octo will be enough to get things going at least within the next year while I slowly add fish and some of the softies. I’m really going to test my patience and don’t plan on adding any SPS until I upgrade the skimmer.

ATO: I have a Tunze osmolator and will probably use a standard 10 gal as an ATO reservoir with cut glass for the cover to minimize RO/DI evaporation.

Sump: I’m planning on going the DIY route and use a 40 breeder. Personally, I really enjoy the few DIY projects I can do within this hobby. I have a DIY 40 gal sump that I kept from my old tank, but I don’t like the design I used and want to redo things. I have a bunch of extra glass to get things right this time around. I'll be using a 7" filter sock from the main siphon drain from the Herbie overflow (sock section will be around 9"x18"), which will go into the skimmer section (which will be about 10"x18"), then into the return section (which should be large enough for the reactors as well). In addition, I’ve been throwing around the idea of a remote refugium with either DSB or benthic zone started with just live/dry rock being fed with slow flow from a manifold. I read a bunch of differing opinions on DSB, low flow benthic zones, and algae refugiums. I used algae in my fuge before and wasn’t all that impressed with it, as far as adding value to the tank, other than the pods. I think I’ll have room for a taller tank, measuring about 20”Lx10”Wx20”H, which would then drain into the return section of the main sump. I’d like to keep the fuge remote to make it easier to take completely off line. It can also be a time out area for any a$%hole fish that aren’t playing nice. Any thoughts or opinions?

Return Pump: I got a Jebao DC12000 from the last group buy (Thanks again, Juan). I want to use a Sea Swirl for my return to help incorporate some random flow in the tank. I need to make a manifold to feed the return, reactors, and remote fuge. I also need a check valve to make sure the Tunze osmolator doesn’t act up when I shut off the return during a water change or something. I think even with the manifold and head loss, the DC12000 should still have enough flow to go through the Sea Swirl and add some nice random flow in the tank. If not, another option I’ve been considering is running the manifold off a Laguna MaxFlo 1500 and the Jebao will serve as the return through 2 Sea Swirls. I think my 1 ” bulkheads through a Herbie should handle the Jebao gph from 5’ of head loss. What do you guys think? What’s my best option, considering minimal power usage and the flow I need/want?

Sorry for the rambling. I've been planning/thinking about this build for the past few months ever since I decided on going with the bigger tank. But it never hurts to get a fresh pair of eyes on the plans.

Looking forward to hearing the input from you all.
 

JJsBoas

New member
Joined
Mar 9, 2013
Messages
108
Likes
1
Points
0
Location
Azusa
#6
Welcome jay! I love my 5x2x2, I felt and still feel that it is the perfect size. As mentioned, plan the sump carefully for what you might want down the line. It will save you money from upgrading later. Get the biggest sump you can.
Hey Steve,

I was honestly going to go with a 120 (4x2x2). But after realizing the jump to a 150 wasn't too much of a price difference (Thanks Aaron :thumb::thumb:), and triple checking the measurements for the wall where the tank is supposed to go, I decided on the 150. Like I said, I'm excited that I decided to go bigger, but I'm also definitely nervous about it too since it's quite the jump in size for me. Regardless, it should be fun and I'm really looking forward to the greater stocking possibilities I have with a 5 footer.
 

JJsBoas

New member
Joined
Mar 9, 2013
Messages
108
Likes
1
Points
0
Location
Azusa
#7
Here are a few more things I've been planning for the build:

Stand: I’ll probably DIY an overbuilt wood stand. My wife’s only request with this tank was to “make it look pretty.” So my plan is to skin the frame with a solid wood face frame and use furniture grade ply, molding, and solid wood for cabinet doors. I’d like to use a Kreg jig to drill pocket holes for screws to make the build look as clean as possible. I’ll leave the color up to my wife, but it’ll likely be some sort of espresso color since that’s what most of our furniture is.

Canopy: Again, I’ll probably DIY a canopy to match the stand. I’m going to use a 6 bulb, T5HO retrofit kit for lighting from reefgeek. I’d go 8 bulbs, but I want to eventually incorporate 2 royal blue LED strips, with 48 LEDs total, to add some pop and sunrise/sunset to the setup. I think the 6 bulb retro kit with the reflectors included in the kit will give me enough light to grow the hopefully easier stuff I want to try. Any thoughts or opinions on my lighting plan?

Aquascape: I have about 90 pounds of dry rock. I need to bleach about 50 pounds of rock from my old tank and I bought another 40 pounds of prime cuts from RAP back in October. I hope to get at least another 50 pounds of dry rock to give me some choices and more options with the aquascape. I want no more than 100 pounds in the display and the rest will go in the sump. I'll seed the dry rock with just few pounds of live rock rubble from the LFS.

Circulation: I got 2 Jebao WP25s from the last group buy. Depending on how these perform and their reliability, I might get 2 more WP25s or 2 WP40s. Otherwise, I'm going to save up for a couple Tunze 6095s.

Dosing: I have 2 BRS 1.1mL dosers and I’ll probably continue using these until I save up for a dosing unit. I didn't have any problems with the BRS dosers at all, set up was easy and no reliability issues during the short time they were running before the move. But I'd like to simplify things even more and a dosing unit will definitely do that. Right now I'm thinking about the Bubble Magus doser based on value and reviews, but the GHL doser is d@mn sweet although too pricey. I was using the BRS two-part, but this time around I think I’m going to use ESV B-ionic 2-part, because I used the ESV 2-part in the past with some really good results.

RO/DI: I have a 4-stage unit from BRS. I just need some new filters and DI resin. I might get a booster pump and some other upgrades to improve the efficiency of the unit.

Reactors: Here’s where I’ll need some real input. I’m pretty old school. I started keeping reefs back in the mid 1990s, had a long break from the hobby for school, and just got back in a few years ago. GFO, carbon, and biopellet reactors are something completely new to me. My initial thought was to run all three, but I’m not completely sold on this approach. As far as the reactors themselves, I’m considering the Aquamaxx reactors, again based on value and solid reviews. Is running all three, carbon, GFO, and biopellets the way to go, or is it overkill?

I know everyone likes pics around here. I'll try to take some equipment pics once I organize the garage a bit more and have a decent staging area for this build.
 

JJsBoas

New member
Joined
Mar 9, 2013
Messages
108
Likes
1
Points
0
Location
Azusa
#8
Finally have an update. Again, I ordered a standard Visio 150 gallon with corner overflow and perimeter bracing through Aaron at SPS Coral Store. Tank took about 4 weeks to make. There was a little issue with the initial delivery of the tank as Visio didn’t install the perimeter bracing. Aaron took care of it and Visio picked up the tank and redid the bracing. Took about a week or two for the fix. No problem as I’m not in a rush to build this tank. I want to get to it of course, but I want everything done right.

Once I got word the tank was ready, I borrowed a van to pick it up. I know this size (5x2x2) isn’t big compared to some of the big 300s being put up lately, but it’s my first “big” reef and the tank looked even bigger in person than I imagined.

Here’s a couple pics of the tank at SPS Coral Store.


Pic of the tank in the back of the van I borrowed with the third row seats down and the middle set of seats pushed all the way up.


Luckily my wife and I planned a little get-together at our place on the day I picked up the tank because I had a couple buddies over to help move the tank into the garage, which is where it will be while I build the stand. I promised my wife I wouldn’t move the tank inside until the stand is done and ready to go.


This is gonna be a slow and steady build as budget is major constraint right now. Wife, 2 year old, and another one on the way (just found out!!!:a21::a21::a21:) = limited reefing budget. No worries, the extra time with no rush gives me time to think things through properly so I can get this build right the first time around.

Next step…stand build. I’m going to build the stand myself and will hopefully start at the end of this month. Gonna use the plans from the popular DIY stand thread on RC. Still gotta order a pocket hole tool to try and make the stand frame look nice and clean. Frame will then be painted with a couple coats of Kilz.

Any advice on where to get decent wood and trim for the skin? I’ll be painting the skin and trim an espresso color to match the other furniture we have, so I may be able to just use some poplar from HD or Lowes. Still up in the air as far as what style of trim I want to go with.
 
Joined
Mar 2, 2010
Messages
20,830
Likes
1,005
Points
113
Location
Orange, CA
#10
Nice tank slow progress is still progress. I'm sure you'll be really happy when its done especially when your not rushed in the planning and all that. Congrats on the one on the way also!
 

Six2seven

Premium Member
Supporter
Joined
Dec 27, 2011
Messages
8,473
Likes
24
Points
38
Location
San Pedro, CA
#12
Nice progress so far. This hobby is about patience so don't stress on the speed. Oh and congrats on the new one on the way.
 

JJsBoas

New member
Joined
Mar 9, 2013
Messages
108
Likes
1
Points
0
Location
Azusa
#13
So far so good. What do u plan on doing for lights and filtration?
Lighting - I definitely want to use about 48 x 3w royal blue LEDs for sunrise/sunset and for some pop. I'm thinking 24 LEDs per heatsink. As far as main lighting, I'm gonna make an open top canopy to help with venting hest up and away from the tank. I REALLY want to do halides, probably 2x 250w Phoenix 14k. I like the 18k-20k look and I hope these with the LEDs will achieve that. The tank will be directly under an ac vent and we keep the house at 78 during the peak of summer. The rest of the year the house stays 72-74, so I'm crossing my fingers that heat from halides won't be an issue with the open top and fans blowing across halides. Otherwise, the backup plan is a 6 bulb T5 retrofit coupled with the LEDs.

Filtration - I'll be using a 40 breeder sump. I have a reef Octo skimmer already but that'll need to be upgraded as the billows increases. Also plan on running all three, gfo, carbon and biopellets, off of a manifold. If that's overkill, taking one offline will be easy with the manifold. Got the dc12000 for the return and manifold. Also have brs dosing pumps for 2-part ready to go. That's the gist of it.

Anything else I should consider?
 

JJsBoas

New member
Joined
Mar 9, 2013
Messages
108
Likes
1
Points
0
Location
Azusa
#14
Nice tank slow progress is still progress. I'm sure you'll be really happy when its done especially when your not rushed in the planning and all that. Congrats on the one on the way also!
Thanks!!! Definitely looking forward to new little aquarium helper. I really don't mind the slow progress bc it gives a chance to really plan things out the right way. More importantly, it helps me spread out the reefing budget so my wife doesn't get PI$$ED.
 

JJsBoas

New member
Joined
Mar 9, 2013
Messages
108
Likes
1
Points
0
Location
Azusa
#15
Nice progress so far. This hobby is about patience so don't stress on the speed. Oh and congrats on the new one on the way.
Thanks, Steve!!! I learned the hard way about not trying to rush things with this hobby. It's actually kinda nice to take time, research, plan, and see things come to fruition.
 
Joined
May 10, 2011
Messages
13,586
Likes
104
Points
48
Location
Eastvale, Ca (Corona)
#16
Lighting - I definitely want to use about 48 x 3w royal blue LEDs for sunrise/sunset and for some pop. I'm thinking 24 LEDs per heatsink. As far as main lighting, I'm gonna make an open top canopy to help with venting hest up and away from the tank. I REALLY want to do halides, probably 2x 250w Phoenix 14k. I like the 18k-20k look and I hope these with the LEDs will achieve that. The tank will be directly under an ac vent and we keep the house at 78 during the peak of summer. The rest of the year the house stays 72-74, so I'm crossing my fingers that heat from halides won't be an issue with the open top and fans blowing across halides. Otherwise, the backup plan is a 6 bulb T5 retrofit coupled with the LEDs.

Filtration - I'll be using a 40 breeder sump. I have a reef Octo skimmer already but that'll need to be upgraded as the billows increases. Also plan on running all three, gfo, carbon and biopellets, off of a manifold. If that's overkill, taking one offline will be easy with the manifold. Got the dc12000 for the return and manifold. Also have brs dosing pumps for 2-part ready to go. That's the gist of it.

Anything else I should consider?
Sounds good to me. I think you will be happier with T5s. That's just my opinion.
 

JJsBoas

New member
Joined
Mar 9, 2013
Messages
108
Likes
1
Points
0
Location
Azusa
#17
Sounds good to me. I think you will be happier with T5s. That's just my opinion.
Hey Nick,

To be honest, I go back forth on a daily basis between T5s and halides. I do like the customization of the T5s with all the available bulb combos. I've just been playing with the idea of halides bc I've never had a reef using halides. Just curious I guess.

Anyway, I noticed on your new build, you're going with the T5/LED combo as well? What T5 bulb combo are you planning?
 
Joined
May 10, 2011
Messages
13,586
Likes
104
Points
48
Location
Eastvale, Ca (Corona)
#18
Hey Nick,

To be honest, I go back forth on a daily basis between T5s and halides. I do like the customization of the T5s with all the available bulb combos. I've just been playing with the idea of halides bc I've never had a reef using halides. Just curious I guess.

Anyway, I noticed on your new build, you're going with the T5/LED combo as well? What T5 bulb combo are you planning?
I like my tank to be more of a 20k. So I'm going with 4 blue +, and 2 coral+. My LEDs will be a 6:1 blue to white. So the LEDs are like having 2 more blue bulbs IMO. I'm hoping my setup will be similar to an 8 bulb t5 fixture.
 

JJsBoas

New member
Joined
Mar 9, 2013
Messages
108
Likes
1
Points
0
Location
Azusa
#20
Hey all,

Been WAY too long since I did an update. Frankly speaking, with a 2 year old and a pregnant wife due in six weeks, I didn’t think I’d make it this far with the build.

I’ve grown more and more anxious about getting this build done since it’s been over six months from the time I picked up the tank. AND I know all hell is gonna break loose once our new baby is born.

So the past few months, my spare time has been reduced to an hour here and there at night after both the wife and daughter are fast asleep. So that small amount of broken time does not make for a fast build. But honestly, the slow progress has given me valuable time to triple check plans and make sure I do things properly and the way they are envisioned in my head.

The following pics and progress spanned the course of the summer staring probably in July. So I started the stand build finally this summer. Used 2x6s on the top frame and vertical supports, and 2x4s for the bottom frame. I wanted an open front for easy access to the sump so I followed the recommendations from the DIY stand thread over on the other site.


Used a Kreg jig and screwed everything together with pocket holes and the kreg blue-coated moisture resistant screws. Everything is level and square.


Sent the wife and daughter shopping so I could get several coats of Kilz primer on the stand frame. Here you can see the pocket holes used to attach everything.


More late night action, I added some in. plywood to the sides and back to add additional support to hopefully prevent racking and twisting when the tank is on and filled with saltwater. Made some cutouts for plumbing and cord access. Also put in. ply on the top and inside of the stand. I used wood filler to fill in my screw holes and get a cleaner look, and I caulked each corner and joint of the stand.


After three or four coats of Kilz, I filed the pocket holes in the stand and sanded them flush. I then painted the interior with high-gloss white. I want high visibility in the sump area and also want some moisture protection. Luckily I had some high-gloss white leftover from a previous build and so the decision was easy. I think I did about 2 coats of the high-gloss white.


Screwed and glued down the in. plywood top and also made a cut-out for my overflow. More wood filler and sanding for the screw holes.


More to follow…
 
Top