Rockstacker's 100 Gallon tank

Joined
Aug 22, 2013
Messages
147
Likes
0
Points
0
Location
Riverside, CA
#1
This video is over a month old, but still reflects the tank's current condition for the most part.
I will post photo and video updates when the opportunity presents itself.

I want to build this as an LPS/Soft coral tank. It is still lightly populated, but adding pieces here and there slowly.

http://www.youtube.com/watch?v=-szCh4CD3zI


Some pictures of the early stages of the tank build.
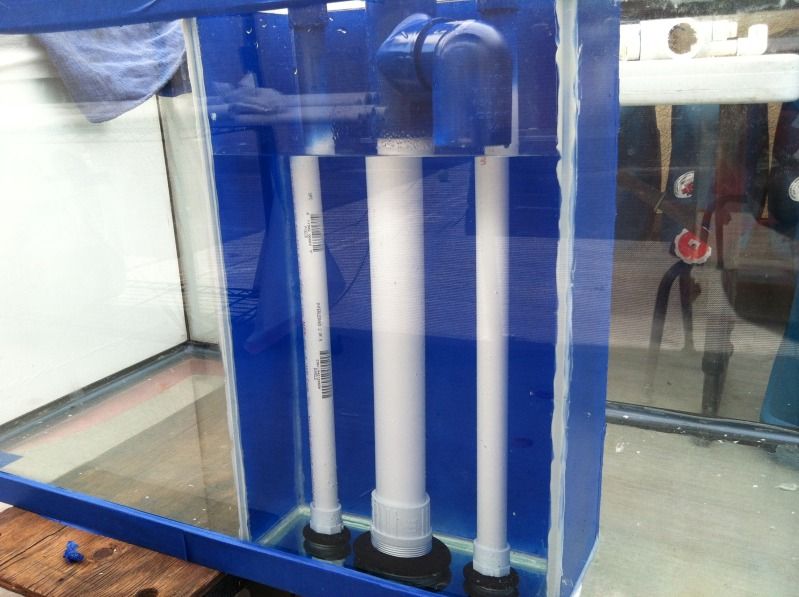
It was a used glass tank. I removed the old overflow and return pipes and built my own. (Pardon the ghetto DIY overflow boxes :) - I did not have any custom acrylic overflows available at the time)


Leak testing, and tuning the Durso standpipe.


First coat of paint on the back. After I got the color consistency that I wanted, I then applied a final coat of black paint so that the tank's exterior was not so bright.


On the stand.


More pictures to follow.
 
Joined
Aug 22, 2013
Messages
147
Likes
0
Points
0
Location
Riverside, CA
#3
Rockscaping


I made a mockup of the tank's interior footprint so I can play with different rockscaping outside of the tank while taking into account the spaces occupied by the overflow boxes.


I used PVC pipes as the backbone for the rocks


Blue tape on the ruler represents the water surface - don't want the rocks to get too high and leave no room for corals on top.


One down, more to go


Rocks in the tank (after a few days of RO/DI bath)


After cycling and livestock slowly moved from the old 50 gallon tank


The tank has matured a bit after several months
 

innerspark

Premium Member
Supporter
Joined
May 10, 2013
Messages
1,908
Likes
8
Points
38
Location
RSM
#9
Nice looking tank and rock work. Cant wait to see it in 6 months to a year when its covered with all kinds of coral growth.
 
Joined
Aug 22, 2013
Messages
147
Likes
0
Points
0
Location
Riverside, CA
#11
Awesome scape! So did you just stack the rocks or glue them to the pvc?

Sent from my SAMSUNG-SGH-I337 using Tapatalk 4
On some pieces, I used the cement kit that I bought along with the dry rock (Marco Rocks) to attach the rocks to the PVC.
Basically I encased the PVC in a thick enough layer of the cement material to ensure the rocks do not break away from the PVC under normal wear and tear.

Initially, the gray cement material stood out against the white dry rock. But as the rocks aged and coralline started growing over both materials the cement became indistinguishable from the rocks.

For some other pieces, the rocks are just stacked on top of each other. I chiseled the rocks at specific spots to make sure they fit together and look like a single piece

On certain areas of the middle piece, I used aquarium silicone to glue smaller pieces of the rock to cover the vertical pieces of the PVC.
And then I leaned larger rocks on either side of the pillar. This forms the cave section in the middle.
The rock that makes up the roof of the cave is sitting on top of the PVC "table" and not glued. The bottom of that rock was chiseled to have grooves where the PVC would fit so the rock would not slide.

I chiseled the bottom of the rocks so that they are stable and freestanding. The less accidents with toppling rocks, the better :)

The rocks are also noticeably positioned closer to the front compared to typical reef rockscaping.
The idea is to have equal amount of void spaces in front and behind the rocks so that fish would be able to swim either in front of or behind the rocks without any bias to either side.
My hope was that this would increase linear swimming space and also provide plenty of visual barriers to block line of sight aggression.
 
Joined
Aug 22, 2013
Messages
147
Likes
0
Points
0
Location
Riverside, CA
#12
Nice looking tank and rock work. Cant wait to see it in 6 months to a year when its covered with all kinds of coral growth.
Thanks.
I am slowly adding to the coral population. I just do not have the disposable income to buy large volumes or full colonies.
Besides, for me it is more fun starting from frags and watching them take over the tank over the years :)

Maybe I can get some great deals at RAP this October.
 
Joined
Mar 7, 2013
Messages
2,697
Likes
15
Points
0
Location
Fullerton, ca
#13
Thanks for explaining. I did my current scape in my tank with the rocks closer to the middle to provide more swim space.

When I scape my new tank I plan on doing something akin to individual rock "islands", with a center rock formation. how thick is the pvc pipe you used and did you glue the pipe together?

Sent from my SAMSUNG-SGH-I337 using Tapatalk 4
 
Joined
Jun 8, 2013
Messages
64
Likes
0
Points
6
Location
Costa mesa
#14
Thats a sweet setup you have going there. I wish i was able to build a tank from scratch like that but i dont have the funds to fuel my dreams. Good luck on your tank and looking forward to seeing more of this tank.
 
Joined
May 29, 2013
Messages
500
Likes
0
Points
0
Location
apple valley
#15
Sweet man love the pvc pipes for the rock support I would have never thought of that bet your fish dont knock your rocks over now
 
Joined
Aug 22, 2013
Messages
147
Likes
0
Points
0
Location
Riverside, CA
#16
PVC pipes are 1/2". I sanded them rough and applied several layers of Krylon Fusion (black). I tried the blue color too but it flakes off like crazy. So I avoid the blue color from now on.
All fittings are glued just to make sure they do not come apart from the weight of the rocks.

All the rocks and painted/glued PVCs spent a couple of weeks in an RO/DI bath just to make sure I get as much toxins out as possible.


The fish and critters can't knock over the rockscape. But somehow the darn hermits find ways to dislodge coral plugs that I insert into the cracks of the rocks.
I was like "Dude! you have all these open rocks you can graze on, and you HAD to dig under that plug?"
 
Joined
Aug 22, 2013
Messages
147
Likes
0
Points
0
Location
Riverside, CA
#18
I added a Jebao WP40 pump.

http://www.youtube.com/watch?v=xaztA4-saS4

http://www.youtube.com/watch?v=bKiqQKgTb0M


All other circulation pumps have been turned off for this test.
The return pump from the sump is still running.

Current settings:
Mode: W1
Speed: S1
Wave interval: About 75% towards maximum duration.

This unit has the newer controller with the following settings available:

Modes
H1: Constant High (13,000LPH / ~3,400GPH)
H2: Constant Medium (not listed on the manual)
H3: Constant Low (4,300LPH / ~1,135GPH)
W1: Runs at preset speed (S1,S2,S3). Knob controls pulse intervals.
W2: Automatic Speed Up (6 steps) and speed down (6 steps). Knob controls duration of each step.
W3: Automatic Speed Up (6 steps) and speed down (8 steps). Knob controls duration of each step.
Else: Reef stream mode. Random speeds / Random intervals.

Speed settings (For mode W1)
S1: 100% speed.
S2: 75% speed.
S3: 50% speed.

Lock: Press and hold to lock the knob settings. This only seems to lock the knob, but not the mode and speed buttons.
Feed: Press and hold to stop the pump for 10 minutes. Press the Feed button again to cancel feed mode manually.


It looks like it is possible to create waves high enough to spill over the rim of my tank. So I had to experiment with the settings very carefully.


I have to say, for a $95.00 unit, this is pretty impressive.
My tank had 2x Hydor Koralia 1050 an 2x Hydor Koralia 550 and they did not produce this kind of water movement.

Comparing price:
Koralia 1050 = $50.00 x2 = $100.00
Koralia 1050 = $30.00 x2 = $60.00
Hydor Smartwave (which I do not have) = $65.00
Total = $225.00

Jebao WP40 = $95.00 x1 = $95.00

If this was available back when I was building my tank, I could have saved a lot of money by getting this instead of the Koralias.
I could have gotten two WP40's and still spent less than the Koralias + SmartWave.


So for my current setup, I intend to use the Koralias to cover any potential dead spots. But I do not see the need to use all four Koralias now.
 

Latest posts

Top