Goobers 85 gallon diy acrylic build (big thanks to Reef Lounge)

Joined
Jan 22, 2013
Messages
1,308
Likes
43
Points
38
Location
Moreno Valley
#41
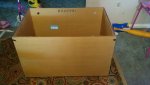
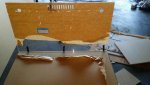
Got a bit bored today so I mocked up an overflow box. I used my dull blade to make a few cuts and scraped the edges uploadfromtaptalk1410917186293.jpg uploadfromtaptalk1410917196440.jpg 
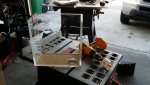
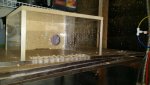
when I glued it together I had minimal bubbles so I'm pretty happy with the mock up. I get my new blade Thursday and hopefully can put together my permanent one. the size overflow I chose is 12x6x12
 
Joined
Jan 22, 2013
Messages
1,308
Likes
43
Points
38
Location
Moreno Valley
#44
So the tank is finally ready to be glued. Mocked up the tank and all corners appear squared. No visible gaps on edges. Wish me luck uploadfromtaptalk1411071651689.jpg
 
Joined
Jan 22, 2013
Messages
1,308
Likes
43
Points
38
Location
Moreno Valley
#45
Still leaving the window open for a eurobrace not sure if I still want the eurobrace since it's 1/2" thick it shouldn't bow. But if it does the eurobrace will be the easy part
 
Joined
May 10, 2013
Messages
2,749
Likes
17
Points
0
Location
Sunland, Ca
#49
Tagging along ... One question after your cut doesn't it get all scratched up ? How do you smooth it out back to that polish finish?
Acrylic sheet comes with a paper backing on both sides as seen in the above pics.
You leave the backing on to mark out where your going to cut and while cutting to protect the acrylic from scratches.
You than peel up the edges on both sides where your glue joint is going to be, leaving the rest in place.

After it's all glued and ready for leak testing then the backing is removed.

As for the edges you just cut, you can use a router with an edge guide or a router table and 1/4" spiral bit to remove about 1/16" from the cut edge.
This leaves the edge perfectly smooth and flat. They also make scrapers for that, but its hard to get the edge perfect by hand, and takes forever
Hope this is helpful.
 
Last edited:
Joined
Jan 22, 2013
Messages
1,308
Likes
43
Points
38
Location
Moreno Valley
#54
Yeah the original cut actually had a big gap on the bottom seam so I had to re cut and smoothen 4 pieces. So instead of being 21.5 high it's now only 21 high but I can't complain
 
Joined
Oct 31, 2008
Messages
1,028
Likes
13
Points
18
Location
Corona
#55
You should do eurobrace...it helps with the water splash and kinda prevent the fish from jumping out...rimless looks nice but then I would never go back to it again.
 
Joined
Jan 22, 2013
Messages
1,308
Likes
43
Points
38
Location
Moreno Valley
#56
You should do eurobrace...it helps with the water splash and kinda prevent the fish from jumping out...rimless looks nice but then I would never go back to it again.
I'm gonna make a mesh top. My waterline is 3" below the tank and the teeth will handle anything that gets near it. It's looking pretty good right now but I can always add a eurobrace down the line if I feel differently
 

Zoarder

Member
2020 Philanthropist
Supporter
2020 POTM
Joined
Apr 26, 2013
Messages
10,643
Likes
49
Points
48
Location
Los Angeles
#59
External overflows won't allow the tank to sit flush against the wall. But the benefit is you get easier access to plumbing and a bit more real estate within the tank.
Actually you can with a peninsula style, that's how I have mine.
 
Joined
Jan 22, 2013
Messages
1,308
Likes
43
Points
38
Location
Moreno Valley
#60
my external box is only 5" so it'll be sitting 5" off the wall, it holds a 1.5" drain and I didn't go pen style since I only think it looks good if its dividing a room or something so I opted for a non pen style tank
 

Latest posts

Top