Row12 (ezzy) 280 Gallon SPS Build Thred
- Thread starter row12
- Start date
Looks like a really nice build. Did u end up going with a fluval sp6? If u did, make sure u put a ball valve after the pump. I have it on my 8' tank, and it's a TON of flow. I am trying to figure out where I'm gunna fit a ball valve to cut back the flow a little bit. What made u go with a separate refugium? Also how are u planning on plumbing it back to the sump?
Looks like a really nice build. Did u end up going with a fluval sp6? If u did, make sure u put a ball valve after the pump. I have it on my 8' tank, and it's a TON of flow. I am trying to figure out where I'm gunna fit a ball valve to cut back the flow a little bit. What made u go with a separate refugium? Also how are u planning on plumbing it back to the sump?
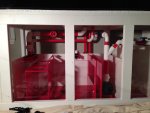
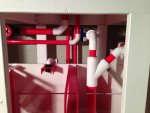
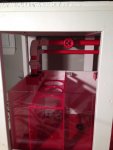
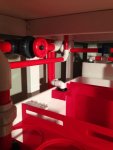
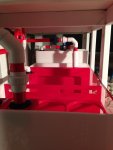
Thanks! I actually got some of my ideas from your sump design. I did get the fluval SP6, but I was concerned it wouldnt be enough flow with my single 1.5" drain and 1" emergency. Since the pump output is 1.25" I used an adapter to go 1.5" to a union, then to a wye. One line off the wye will go directly back to the tank, while the other will feed a manifold which will have ball valves for the following: refugium, chiller, spare, and calcium reactor. The only reason why I went with a seperate fuge was to maximize the refugium size without having such a large sump. The sump has a center bulkhead where the refugium will gravity feed back into. I made progress on the plumbing this past weekend, but after multiple trips to the fish store and multiple orders online I'm still waiting on some fittings to finalize the layout. I'll post pics of the plumbing soon.
Awesome. YA I wouldn't mind seeing how u set it up. I was thinking about making my new sump with no fuge, and adding a separate fuge next to the sump. I would do it exactly how u did, and make it taller. Let's u have larger water volume. What are u planning on putting in the sump? Just chaeto? Or u planning on having rocks and the whole nine yards? I'm debating on whether a fuge that size really does anything on a tank our size.
I like your idea of cutting the carpet for new flooring, but what about the new flooring under the tank or if you move it?
 ️
️
Ha sorry just a discussion. Great tank for sure.
Still waiting on your tank Cory.
Still waiting on your tank Cory.
Just caught up from your intro post and let me commend you. Very well thought out planning. This is definitely going to be an amazing tank once all is set in place. Can't wait to see what's next.
On a side note, I received the remaining plumbing parts yesterday and I should have the plumbing done today. I can finally plug in the Fluval SP6 and leak test the plumbing.